.png)
In this step, we will assign the DepartmentReader permission to the app created in Step 1. This role grants read access to department information and cost reports at department scope. It's important to note that the DepartmentReader role DOES NOT provide any WRITE permissions to Mavvrik platform.
Why this matters: Mavvrik only ever needs read access to generate cost data and recommendations; it never writes to your Azure account. Granting a read-only role like DepartmentReader (rather than something broader) keeps the integration's blast radius limited if credentials were ever compromised.
Procedure in this step is also documented by Azure here : #assign-the-department-reader-role-to-the-service-principal
-
Unlike other billing account types, Azure does not allow role assignment of Enterprise Agreement (EA) accounts using the user interface. Instead, we'll use the official Azure HTTP API to achieve this.
-
Before hitting the API, lets capture few details we would need to pass to the API
-
billingAccountName : This is simply an ID of your billing account you can capture from Cost Management + Billing > Properties.
-
departpartName : This is simply an ID of your department account you can capture from Cost Management + Billing > Overview
-
billingRoleAssignmentName : This parameter is a unique GUID that you need to provide. You can use the GUID Generator website to generate a unique GUID.
-
Principal ID : This is Enterprise App's Object ID. For this, navigate to Microsoft Entra ID > Enterprise applications and look for the app we created in step 1 and capture it's Object ID
-
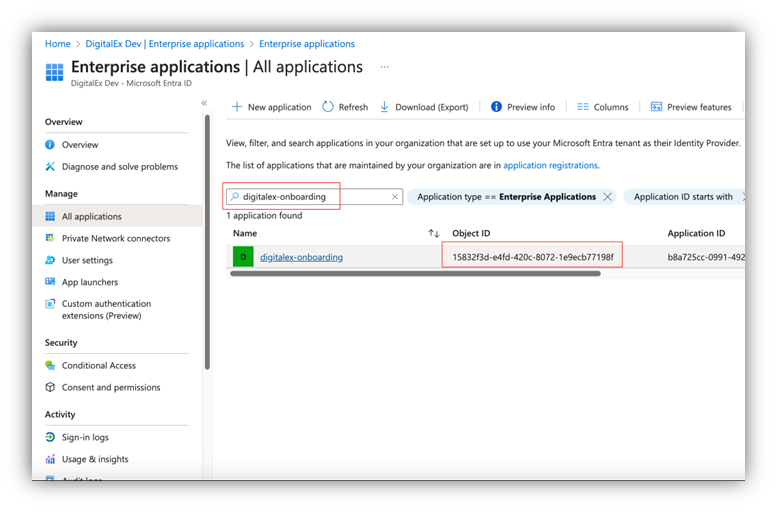
-
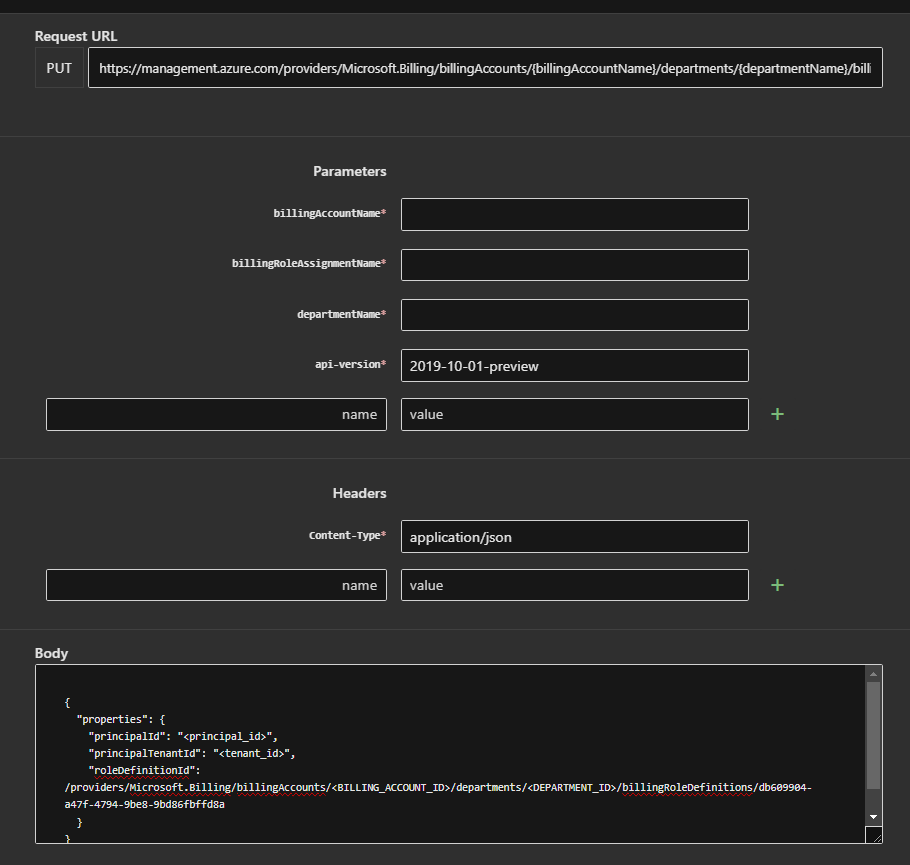
We're now ready to hit an API to make role assignment. Open following URL on the same browser window where you have Azure portal open : Enrollment Department Role Assignments - Put and click Try It and select correct directory if it asks. Fill in the parameters, billingAccountName, departmentName and billingRoleAssignmentName with the values captured in last step. And in the body section put following JSON,
{
  "properties": {
    "principalId": "<principal_id>",
    "principalTenantId": "<tenant_id>",
    "roleDefinitionId": "/providers/Microsoft.Billing/billingAccounts/<BILLING_ACCOUNT_ID>/departments/<DEPARTMENT_ID>/billingRoleDefinitions/db609904-a47f-4794-9be8-9bd86fbffd8a"
  }
}
-
Make sure to replace
<principal_id>and<tenant_id>and<BILLING_ACCOUNT_ID>and<DEPARTMENT_ID>with correct values captured in earlier steps. roleDefinitionId is an ID for DepartmentReader role as documented here : permissions-that-can-be-assigned-to-the-service-principal. After filling in all the parameters and body, click Run. API call should return 200 OK. if it doesn't, do not proceed.