.png)
Alerts Overview
The Alerts Dashboard enables you to create, manage, and track automated alerts for cost and resource events across Cloud, AI, Kubernetes, Datacenter, and SaaS environments. You can configure alerts as daily, weekly, or monthly notifications to monitor cost spikes, RI/SP expirations, and other key thresholds. Alerts support flexible filtering by perspectives or custom scopes, and can notify selected users and channels via email, integrated tools, or within the Mavvrik UI—helping you take timely action and stay ahead of potential issues.
Why this matters: a cost spike or an expiring RI/SP commitment is only actionable if you catch it in time — by the time someone happens to open the dashboard and notices, the spend has often already happened. Alerts push the notification to you the moment a threshold is crossed, so acting on it doesn't depend on remembering to go looking.
This shows up differently depending on your role:
-
FinOps managers use RI/SP expiration alerts to catch a commitment lapsing before it silently reverts to on-demand pricing.
-
Engineering leads use cost-spike alerts scoped to their own team's Perspective as an early signal to investigate — a runaway job or misconfigured autoscaler, before it shows up as a surprise in monthly reporting.
-
Finance leaders use monthly cost alerts across broader scopes to catch drift against plan early enough in the month to still act on it.
Alert Workflows
Steps to create Alerts
-
Login with user roles as Owner/Editor
-
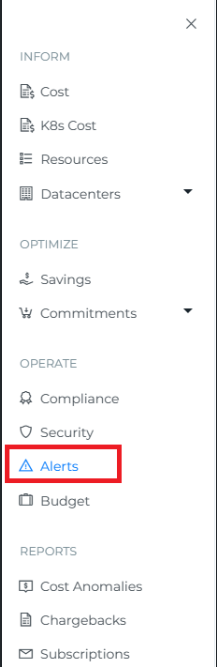
Click on Menu
-
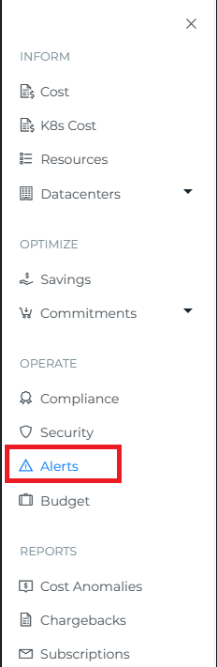
Click on Alerts under Operate
-
Click on +Create Alerts
-
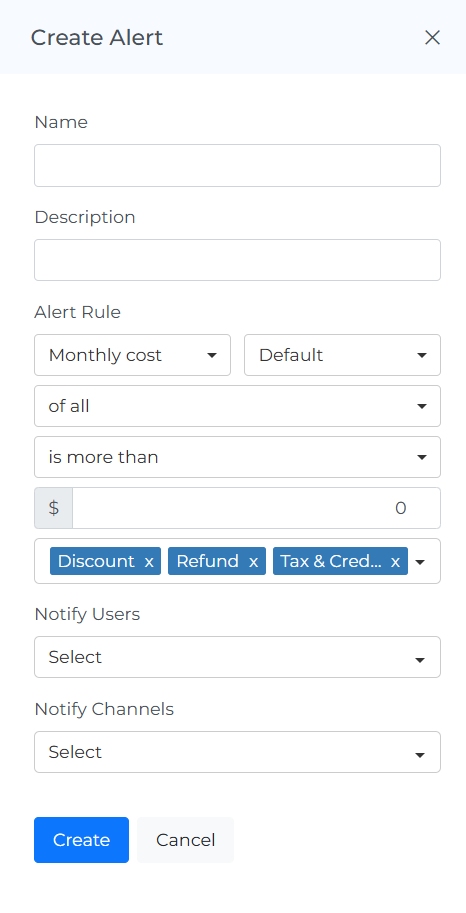
Enter Name & Description
-
Select the Alert Rule type: Monthly cost, Weekly cost, Daily cost, RI expiration, or SP expiration
RI expiration and SP expiration work differently from the three cost-based rule types. Picking either of these replaces the rest of the form (Data Source, Scope threshold, cost options) with a single field: Select options, a multi-select of lead times — 7 days prior, 14 days prior, 30 days prior, 60 days prior, 90 days prior. Pick one or more, and you're notified that many days before an RI or SP commitment expires. There's no dollar threshold, Data Source, or cost-option filtering for these two rule types — skip ahead to step 12 (Notify Users/Channels) after selecting your lead time(s).
The remaining steps in this section (7–11) apply only to Monthly cost, Weekly cost, and Daily cost.
-
Select Data source. Live options include: Cloud, Agentic, Gen AI, AI Assist, Kubernetes, Datacenter, Confluent, Databricks, Datadog, MongoDB, Snowflake, and any customer-configured custom provider integrations (shown by that integration's own name).
-
Cloud: All public cloud accounts cost will be tracked for the alert.
-
Agentic / Gen AI / AI Assist: AI-related accounts cost will be tracked for the alert, split by these three distinct AI data sources rather than one combined "AI" option.
-
Kubernetes: All Kubernetes accounts cost will be tracked for the alert.
-
Datacenter: All Datacenter accounts cost will be tracked for the alert.
-
Confluent / Databricks / Datadog / MongoDB / Snowflake / custom provider: each SaaS integration you've onboarded appears as its own separate Data Source, rather than one grouped "SaaS" option.
-
-
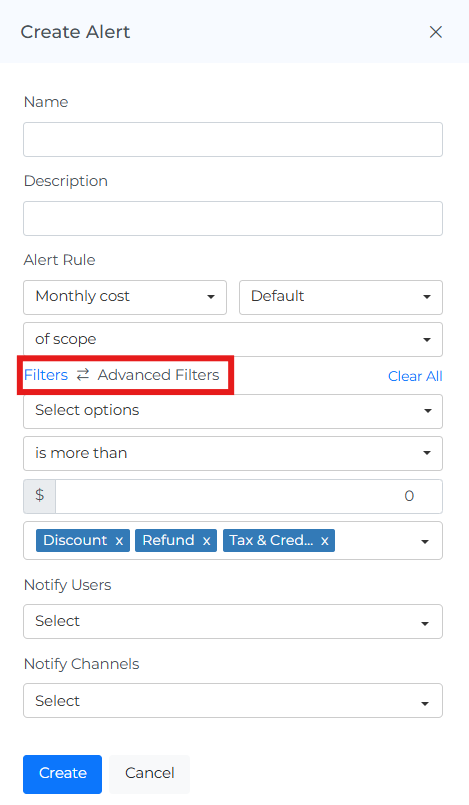
Select the of all/Perspective/Scope
-
All: all resource costs will be tracked for the alert.
-
Perspective: select perspectives which are already created (Perspectives ) & that perspective's filters will be applied to the alert. (Perspectives)
-
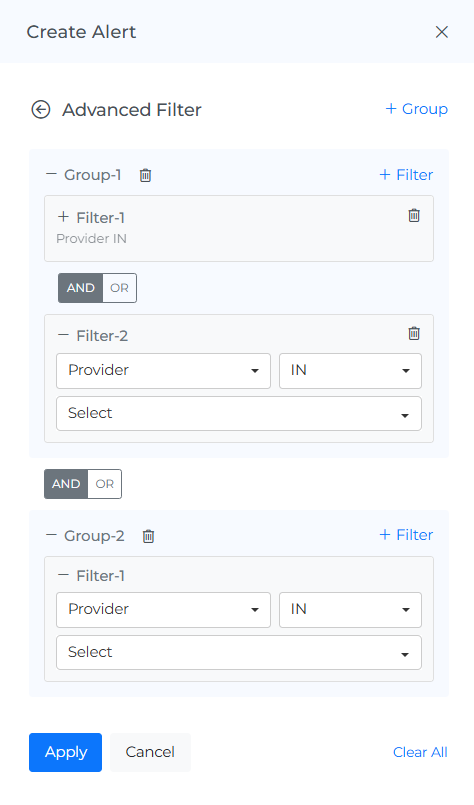
Scope: create your own custom filters for alert using basic and advanced filters.
-
-
Select is more than / is going up by
The threshold field's unit depends on this choice. With is more than, the next field is a dollar amount ($) — a fixed cost threshold. With is going up by, the field switches entirely to a percentage (%) — the alert fires when cost increases by that percentage, not by a fixed dollar figure.
-
Enter the threshold value ($ amount for "is more than", or % increase for "is going up by")
-
Configure how the cost is calculated:
-
Cost Field — a dropdown for Actual, Net Actual, Amortized, or Net Amortized, the same cost-field choice used on the Cost dashboards.
-
Discount / Refund / Tax & Credit — toggle chips, all included by default; click the "x" on any of them to exclude that component from the alert's cost calculation. This is the "Select different Options to filter out the cost" step — multiple can be removed at once.
-
-
Select the users to Notify ( You can select multiple users)
-
Select channels to Notify ( You can select multiple channels)
Note: To be notified through channels, you need to create different channels from the Integration module. Integrations
Best practice: an alert is only useful if it reaches someone who's still around to act on it. If every notified user for an alert leaves the team, that alert effectively goes silent with no error or warning. Notifying a channel (Slack/Teams) alongside individual users is a good safeguard — a channel keeps working even as individual membership changes, so review and refresh the notified-user list periodically rather than assuming it stays accurate on its own.
-
Click Create
-
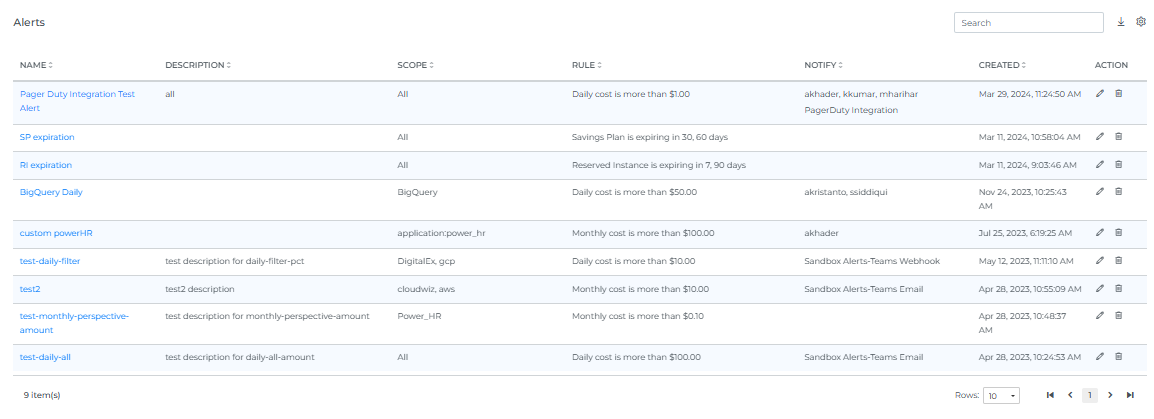
New Rule is created and displayed as shown below.
When you select the number of rows, you will be able to view that same quantity of rows on the page."
-
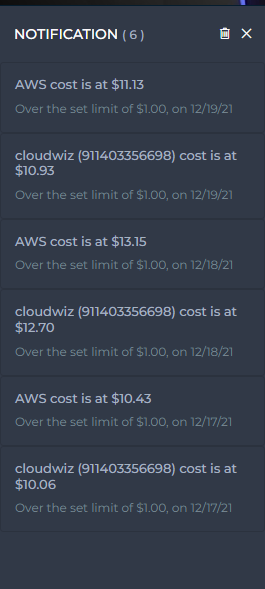
If you select both the 'Notify User' and 'Notify Channel' options, a notification will be sent to the user via email and on the selected channels. The notification will also be displayed in the Mavvrik UI next to the user's profile name
Note: Users can view specific notifications if they are added as notified users for a specific alert
-
Click on Bell Icon to view the Notification
Steps to Edit Alerts
-
Login with user roles as Owner/Editor
-
Click on Menu
-
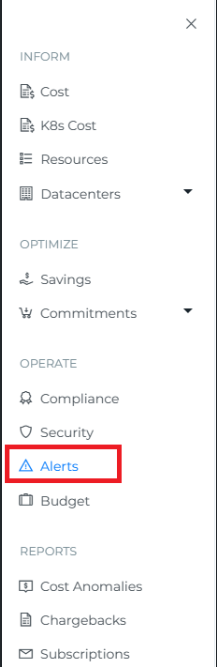
Click on Alerts under Admin
-
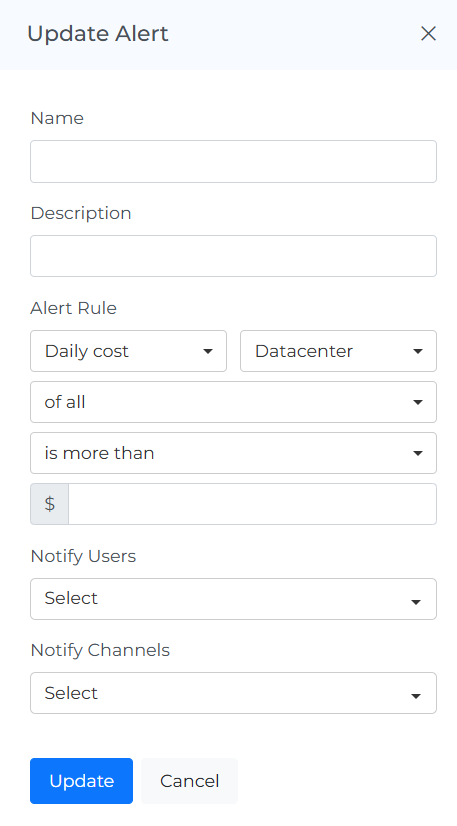
Click on the Edit icon
-
Change the Alert Rule
-
Click Update
Steps to Delete Alerts
-
Login with user roles as Owner/Editor
-
Click on Menu
-
Click on Alerts under Admin
-
Click on the Delete icon
-
Click Delete button from the popup
-
Alert is deleted from the List.
-
Click on the Cancel or X icon to close the pop-up
Clone Alerts
Clone an existing alert to quickly create a new one with the same setup already in place.
This is useful when you need a similar view for another team, business unit, environment, or customer use case.
Instead of rebuilding filters and structure from scratch, you can start with a copied version and make only the needed changes.
The cloned alert is independent, so updates to it do not affect the original.
-
Login with user roles as Owner/Editor
-
Click on Menu
-
Click on Alerts under Admin
-
Click on the Clone icon (You can see same filtered options selected)

-
Edit the required filters and create
Page Tools
The Alerts list
The list table's columns are:
-
Name — clicking it takes you directly to the page the alert's Data Source applies to (Cost, AI Cost, AI Assist, SaaS Cost, etc.), with the same Scope/Perspective and cost options pre-applied.
-
Description
-
Source — the Data Source, e.g. Cloud, AI Assist, Agentic, Databricks.
-
Scope —
All, orPerspective: <name>if scoped to a Perspective. -
Rule — a summary of the rule, e.g.
Monthly cost is more than $100.00. -
Notify — the notified users and channels for that alert.
-
Action — Clone, Edit, and Delete icons.
Header Icons
Info
The "last updated" date and time stamp show when the data on the page was last refreshed. This can be useful for understanding the age of the data and determining if it is up to date.
Reload Option
The "reset" option allows you to clear all filters and selections from the page, returning it to the default view. This can be useful if you want to start over or view the data in its original form.
Help
If you click on the "?" icon, you can access the help documentation for the page. This can provide you with additional information and guidance on using the page and its features.
Troubleshooting
-
If a notification isn't arriving, confirm the notified users are still active and, if using a channel, that the channel integration is still connected.
-
If an alert isn't triggering when expected, double-check the Data Source and Scope/Perspective selected — a mismatch here is the most common reason an alert stays silent.
-
If you're trying to set an RI or SP expiration alert and can't find the Data Source or dollar-threshold fields, that's expected — those two rule types only have the "Select options" days-prior field, nothing else.
FAQs
What's the difference between choosing a Perspective and choosing Scope when creating an alert?
Perspective applies an existing, reusable set of filters (one you've already created for other purposes, like a Budget or a Cost view). Scope lets you build a one-off custom filter just for this alert instead. Use Perspective when the same filter logic should stay consistent across multiple features; use Scope for something specific to this one alert.
What happens if I select both Notify User and Notify Channel?
Both fire — the selected users get notified by email and see it in the Mavvrik UI next to their profile, and the selected channels also receive the notification. It's not either/or.
Why did the $ field turn into a % field?
It depends on whether you chose "is more than" or "is going up by" in step 9. "is more than" is a fixed dollar threshold; "is going up by" is a percentage increase — the field itself changes type to match.
Can I set a dollar threshold on an RI or SP expiration alert?
No. RI expiration and SP expiration alerts only use lead-time options (7/14/30/60/90 days prior) — there's no cost threshold, Data Source, or cost-options filtering for these two rule types.