.png)
Configuration steps
Step 1: Download the cost report in CSV format
Log in to the provider portal and download the cost report in CSV format
Step 2: Convert the downloaded CSV
Convert the CSV file into the required scheme with the following columns
|
Column Name |
Description |
|---|---|
|
product_name |
type of product code |
|
usage_type |
type of usage |
|
description |
description of the product |
|
location_id |
location |
|
consumed |
number of units |
|
included |
number of quantities included |
|
quantity |
number of quantities included |
|
rate |
rate of the service |
|
cost |
cost of the service |
|
invoice_month |
invoice month |
|
usage_start_time |
usage start date |
|
usage_end_time |
usage end date |
|
provider_code |
provider code |
|
provider_currency |
currency of the provider |
|
billing_account_id |
billing account ID |
|
billing_account_name |
billing account name |
|
usage_account_id |
usage account ID |
|
usage_account_name |
usage account name |
|
cloud_resource_id |
cloud resource id |
|
category |
service category |
|
unit_of_quantity |
the unit of quantity |
|
extract_time |
the data and time |
|
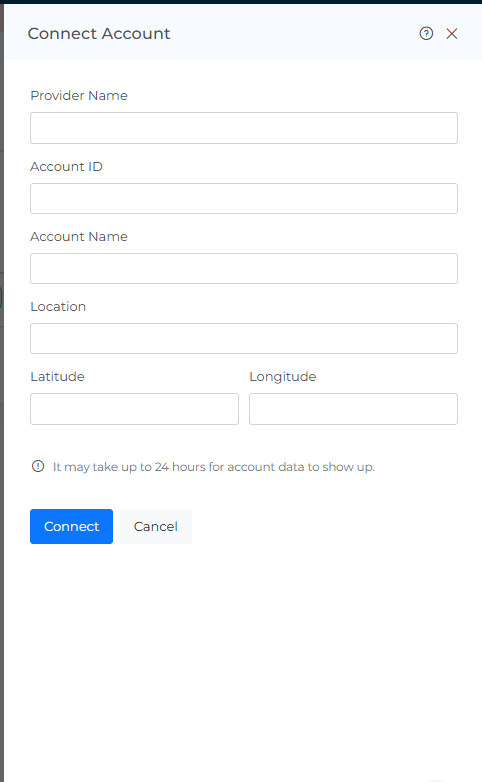
Fields |
Mandatory |
Optional |
|---|---|---|
|
Provider Name |
Yes |
No |
|
Provider Description |
No |
Yes |
|
Account ID |
Yes |
No |
|
Account Name |
Yes |
No |
Step 3: Upload the CSV to the Mavvrik portal
Why this matters: not every SaaS or on-prem system has a native Mavvrik integration; Custom Provider is the fallback that lets any cost source with a downloadable CSV get into Mavvrik, as long as the file is reshaped into the expected schema first.
Below are the steps to upload to the Mavvrik portal
-
Go to the Mavvrik tenant and log in
-
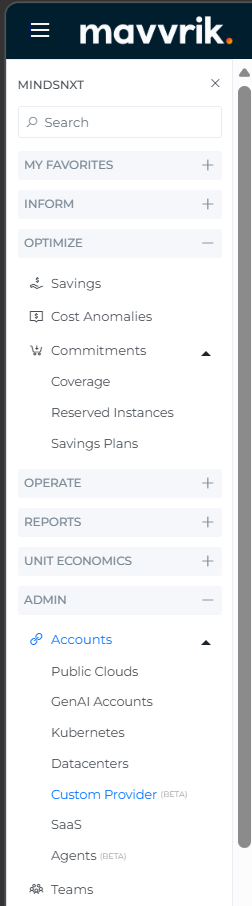
Click on menu → Admin
-
Click on the custom provider
-
Fill in the details and click on connect
-
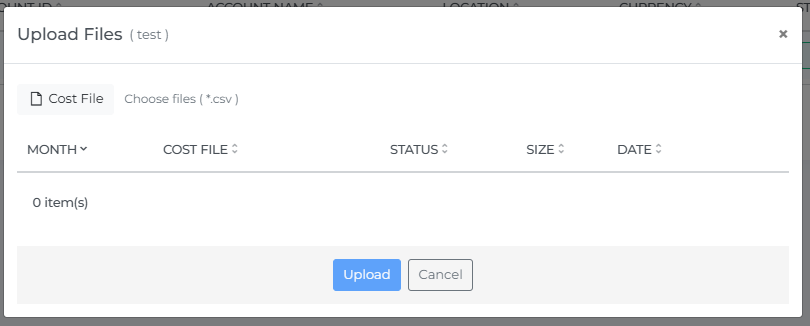
Click on upload and upload the converted CSV file

-
Click on Choose the file and upload the CSV file
-
After uploading the file, click on data ingestion

-
After the ingestion is successful, the data will be visible on the cost dashboard
Troubleshooting
-
If the upload fails or is rejected, confirm the CSV's column headers exactly match the schema listed above; Custom Provider does not auto-map differently named columns.
-
If cost doesn't appear on the dashboard after ingestion, verify the mandatory account fields (Provider Name, Account ID, Account Name) were filled in during setup, and that you clicked data ingestion after uploading the file.
FAQs
Which fields are mandatory in the account setup, and which are optional?
Provider Name, Account ID, and Account Name are mandatory. Provider Description is optional.
Can I use Custom Provider for a SaaS tool that already has a native Mavvrik integration?
You could, but you shouldn't need to; Custom Provider exists specifically as a fallback for cost sources without a native integration. If a native option exists, it will require less manual CSV reshaping than this path.